In this article I will walk through the process of setting up an ASP.NET web application on a shared GoDaddy Windows server.
I will mainly walk through a typical ASP.NET or .NET MVC deployment using a VPS on GoDaddy. That's a very specific scenario, but I find that Windows based hosting solutions aren't talked about too often online these days.
And as someone who has spent a considerable amount of time working on .NET technologies on shared hosting environments, I know how confusing that process can be often times.
With that, let's get started.
Select a Windows plan
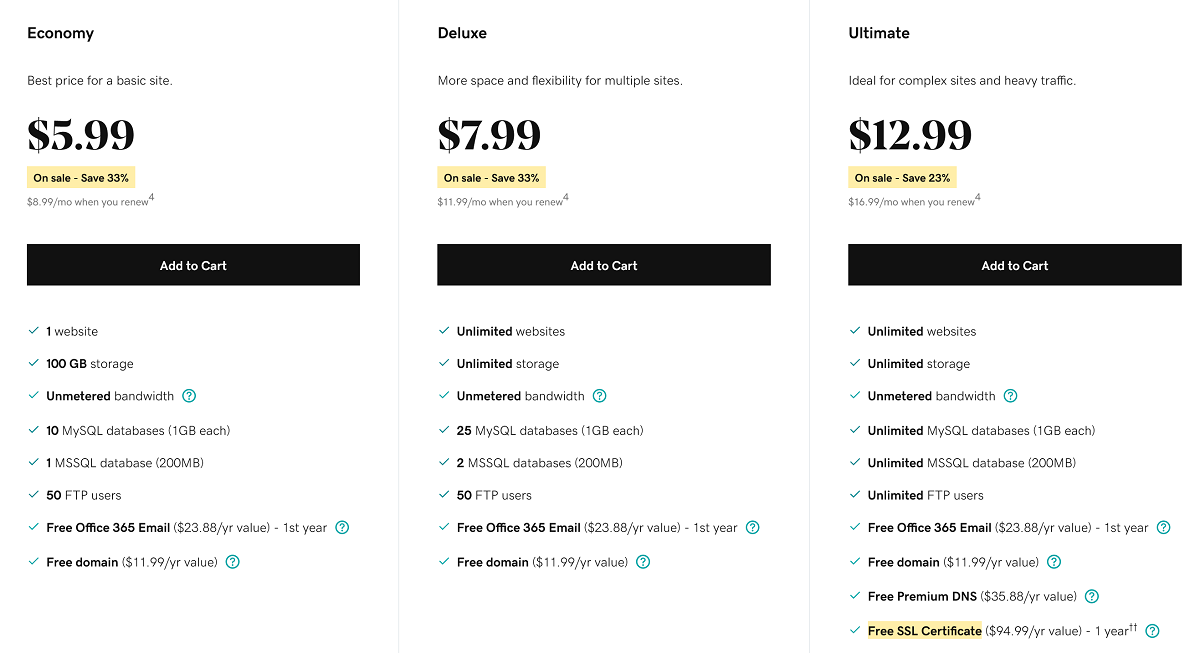
GoDaddy offers 3 different options when it comes to Windows hosting. The cheapest option is always the most appealing to most people, but in this case the Deluxe option gives you exponentially more features and the Ultimate package might be the best bang for your buck.
The main difference being that the Economy package only allows you up to 1 website on the server, while the Deluxe package allows you unlimited websites but limited databases. The Ultimate package offers you both unlimited websites and unlimited databases.
If you are going to be doing alot of work with multiple databases (more than 2), then the Ultimate package makes the most sense.
GoDaddy
Whichever plan you pick however, you will be given access to the Plesk control panel for your site management and database management needs.
What is Plesk?
Plesk is a leading server management platform and control panel that can run on various servers, offers an extensive list of extensions and comes with a built in WordPress toolkit, if you are looking for a quick plug and play site solution.
Essentially it is software that handles managing your VPS and your websites through its own online interface.
And it is the software that GoDaddy uses to manage your Windows hosted websites.
From my experience with Plesk, it is overall a decent tool to manage website configurations and even background tasks, such as database backup automation.
The interface isn't the most futuristic or advanced on the planet and it does have a slight learning curve associated with it. However, aside from setting up a new website, there isn't a daily need for the panel in any way.
You can do most things that you can accomplish with IIS through the Plesk panel.
Add your domain
Once you have signed up for a Windows hosting account, it is time to create your website on the Plesk panel.
Go to your hosting account page on GoDaddy and you should see the following options at the top of the page.

GoDaddy
The "Plesk Admin" option will launch your server panel on a separate window.
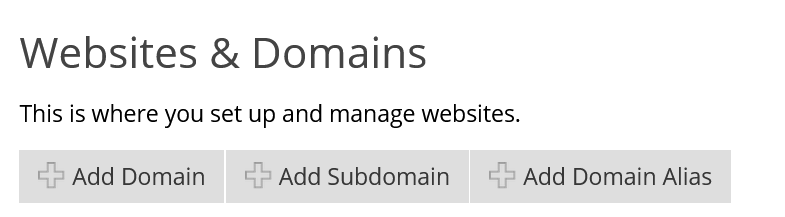
The first thing that you'll want to do is to add your domain (regardless of where you registered it) to the panel. At the very top of your Plesk page you should see the following options. Click on "Add Domain" to continue.
GoDaddy
On the following domain entry form you only need to fill out the domain name that you wish to use and the directory that you will use for your websites files.
You can typically leave these blank as the defaults are the most common use case scenario.

GoDaddy
Remember this is not a domain purchasing form. This assumes that you have already registered your desired domain and have access to the DNS records.
Publish your web application
There are multiple different ways to publish and deploy an ASP.NET web application. You can precompile the entire web project, in which case each page of your website will receive it's own DLL file with a uniquely generated name on each build.
Or you can precompile with update, in which case you won't have to rebuild your application in order to make changes to any front-end code. However you will still need to recompile for server-side code changes.
Start by right-clicking on your desired application and selecting the "Publish" option.
You have a few more options when it comes to where you want to publish your application.
You can FTP the contents directly from this form if you so wish and if you have created the appropriate FTP accounts (more on that below). For the sake of this example though, I will simply be publishing to a directory on the local file system.
Once you select a directory path and click next, you should now see the FolderProfile form.
You can either publish your Debug configuration or your Release configuration. Make sure that the precompile option is selected. The Configure link to the right of the precompilation checkmark will take you to the following form:
Depending on how you want to deploy your site, you have various options here and I don't have any particular recommendations. Once you have saved your publish profile, you can now click on "Publish" and after some waiting time you should see your output directory ready to be transferred to your GoDaddy server.
Create your databases
In order to create your databases with GoDaddy you will have to go through the Plesk panel interface mentioned above.
Locate your website from the main Plesk page and you should see the following menu option:
Clicking on the "Add Database"button will take you to the database entry form to fill out. This is where you will give your database a name and where you will select the type of database that you wish to create.
GoDaddy Windows hosting allows you to choose from either MS SQL or MySQL as the RDBMS of choice.
Recall that based on your selected package you might have limitations in database creation. The Deluxe package for example only allows you to create up to 2 SQL Server databases and 25 MySQL database. While the Ultimate package gives you unlimited databases to create.
You will also have the option of creating a user account for each particular database. It is typically always best practice to give anyone that is going to be working with your database their own unique user accounts configured to their roles.
This also makes it simpler later on to remove users who are no longer working on your application without causing any issues to other users.
Once you have created your database, you can now log in to the remote database in the same manner as how you would connect to any database that you have worked on.
If you are using MS SQL this would typically be either SQL Server Management Studio or Azure Data Studio.
FTP
While you are not necessarily required to create an FTP account for your websites, as you can manage your files directly through Plesk, it is typically much faster and a much more streamlined process to do so through FTP.
You can also benefit from added security, as you can create separate FTP accounts for each person working on your application and then later on simply revoke access when needed.
Locate your website once again in the Plesk panel and click on the "FTP Access" link shown below.
That will take you to the FTP management panel. Click on the "Add an FTP Account" button shown below.
Here you can configure the new FTP user account as you wish. This includes setting read and write permissions as well.
If you are going to have multiple people work on your web applications, it definitely makes sense to create different accounts. In this way, when someone leaves the project for any reason, you can easily invalidate that single FTP account without affecting anybody else's work.
Note you will need some form of FTP software. You have many options when it comes FTP clients. Though the most popular one you will find is FileZilla.
Set up your DNS
If you purchased your domain through GoDaddy then you won't have to do anything extra in this step.
If you purchased your domain through another 3rd party domain seller such as Google Domains however, then you will need to update your DNS records accordingly.
This step will assume that you purchased your domain through Google Domains.
The first thing that you will want to do is to locate your nameservers on GoDaddy. And you can do that by going to the Domain management panel.
Note, this is located on GoDaddy and not on the Plesk panel.
In the Domain Manager, select the DNS menu option and then the Manage Zones option. On the following page you can enter the domain that you wish to see DNS records for.
Your domain should appear in the result set. You will need to locate the NS records for your domain.
You will need these records in order to update them on the Google Domains side. So head on over to Google Domains and locate your domain. You will need to load the DNS records for your domain, which you can find from the following link.
On the following page you'll want to select the "Use custom name servers" radio button and enter the NS records that you received from the GoDaddy domain management panel.
Once you save the new NS records you will have to wait some time for the records to propagate accordingly. This typically takes less than 24 hours.
You have a few options when it comes to setting up an SSL certificate with GoDaddy. You can either purchase an SSL cert through a 3rd party vendor, purchase one directly through GoDaddy, or you can set up a free SSL certificate.
Depending on the route that you take, the steps will be different.
And whether you go with a free certificate versus a paid certificate is up to you. There is still some debate online as to whether a paid certificate holds more validity to browsers and to search engines.
If you choose to go the free route however, here is a quick write-up on how you can setup a free SSL certificate on GoDaddy.
If you choose to purchase your SSL certificate through GoDaddy, then you can follow this write-up on how to set up a paid SSL certificate on GoDaddy.
There is one last step to take in order to get your website up and running.
You will need to make one addition to your production web.config file.
Add the following directive under the <system.web> tag in your web.config.
<trust level="Full" />
Save and reupload to your server and your ASP.NET website should now be live.
In closing
Regardless of the framework or even the programming language, publishing a website to a production server involves intimate knowledge of the hosting environment.
This is particularly useful when things go wrong and require quick action to fix. If you followed these steps and now have a live website running on a shared hosting server, then congrats are in order.