Angular.js is a fairly newcomer in the JavaScript framework world. It was first introduced in 2012 by a Google employee, and has since become a project maintained and managed by Google. It's aim is to simplify single-page-applications by providing developers with an MVC like structure for JavaScript.
It primarily works by providing custom HTML tags that aid in binding DOM elements with a model, such as JavaScript variables or JSON data. You can better leverage your JavaScript by splitting it up into controllers and also modules, which I will go into further a bit down below.
I've been using Angular.js for a while now, which is why this is mainly a quick guide, because I feel that this is the barebones info require to get started. I personally avoided using it for some time now, as I didn't feel like I needed yet another JavaScript file to load into my page, however after implementing it, I can definitely appreciate it much more. Stringing together HTML snippets in a web service function and returning it to the front-end is quick to implement, but a giant pain to update and debug.
With Angular, you end up with cleaner JavaScript code and automatic two way data-binding, which is perfect for AJAX heavy sites. So let's get started. I'll give a step by step tutorial and fill in the gaps with definitions and concepts as I go through the process. This is intended for the Angular noob that just wants a quick test project to get Angular set up and running on their websites.
1. Download Angular
Let's start off by adding Angular.js to our projects, so head on over to https://angular.io/ and download a copy , or just reference the following in your head section. Either or, I don't have any qualms with either approach. At least not in this post.
<script src="https://ajax.googleapis.com/ajax/libs/angularjs/1.3.2/angular.min.js"></script>
2. Create A JavaScript File Called app.js
This will house our Angular module. Modules are where we define our Angular applications. It's where all of our controllers will reside from now on. Our app.js file will contain our model and our controller definitions for this example. Some examples have you make a separate JS file for each controller, which is fine, but for the sake of brevity we'll work with just one. But if you need more separation then feel free to split it off as much as you'd like. Let's start off our file with the following:
(function() {
    var app = angular.module('products', []);

})();
Here we are declaring our module that we will use for the remainder of this tutorial. It will be named "products", and we will pass into it an empty array for now. But technically that is where we would define dependencies to other modules if we had any.
If for example, we had another module declared somewhere named 'stores', then we would reference it in this module with:
var app = angular.module('products', ['stores']);
3. Create A Controller
So now we get to the heart of our code. We can define a controller inside of the module that we just defined up above. We can define our data model inside of the controller and the functions that it can perform as well. We can create as many controllers as make sense to our project. But for this example, I'll just create one, to keep things simple.
(function() {
    var app = angular.module('products', []);

    app.controller('ProductController', function() {
           this.productList = prod;

           var setPrice = function(value){
                this.productList[0].price= value;
           };
    });

        var prod = [
        {
            name: 'asus flip',
            price: 222.99,
            description: '. . .',
            canPurchase: true,
            soldOut: false
        }
    ];
})();
Here we're specifying that our new controller, which we named "ProductController", belongs to the 'products' module, and we're defining a new function for it and a variable we'll call productList.
We created a variable productList inside of our controller and a function setPrice that will be used to update the the price of the first product in our array. We also have a prod array with a list of product objects defined down below that will act as our model.
4. Reference The Angular Module
Now that we have our boilerplate out of the way, we can get to making it do something on our webpage. The first thing we'll want to do is to reference Angular and our Angular module that we just created. So let's add the following to our head section.
<script src="http://ajax.googleapis.com/ajax/libs/angularjs/1.2.26/angular.min.js"></script>
<script src="app.js"></script>
In order to make our webpage an Angular application we need to include the "ng-app" directive in our HTML tag. And we'll register our controller while we're at it too in a separate div inside of that. We can specify our controller on the same line as well, but if we're going to have multiple controllers per page, then we'll want to go and put them in their own separate blocks.
<html ng-app="products">
<body>
<div ng-controller="ProductController as prodCtrl">

</div>
</body>
</html>
With that, we've just told our page that this is an Angular application that will use the "products" module that we declared in app.js, and that our controller will have its scope within the div that we've declared. A little about the controller directive syntax:
Defining a Controller
<div ng-controller="ProductController as prodCtrl">
Directives are tags that bind our HTML to our JavaScript code. It's an HTML tag defined in Angular, that tells Angular to run or reference some JavaScript code. In our case, our controller references the ProductController, which belongs to our products module, and we're going to use an alias in order to reference it in our source. From here on, when we want to work with our controller we'll be using prodCtrl.
Note that we will only have access to our controllers variables and functions within that div's scope. Adding any functions or adding variables that belong to said controller outside will simply resolve the same text back.
5. Let's Add Some Expressions
Expressions are how we insert dynamic values into our html. If we look above to our controller definition we defined a variable and a function, and we can reference those in our html using expressions with the following syntax:
{{ expression }}

or

<div ng-bind="expression"></div>
Both will render the same output. Expressions can be arithmetic expressions or string manipulation expressions or operations on our variables and function calls, so they're very versatile. Here's a full example of the entire test project so far.
<html ng-app="products">
<head>
<script src="http://ajax.googleapis.com/ajax/libs/angularjs/1.2.26/angular.min.js"></script>
<script src="app.js"></script>
</head>
<body>

<div ng-controller="ProductController as product">
    Name: {{product.productList[0].name}}
    Price: {{product.productList[0].price | currency}}
    Can Purchase: {{product.productList[0].canPurchase}}
    <input type="text" ng-model="product.productList[0].price" />
</div>

</body>
</html>
And now to explain it. Inside of our controller div we're just spitting back out the first product that we had defined in our controller in our app.js file. The input element is a bit different. We specified a new tag to it. The ng-model tag. This tag tells Angular that this input element needs to bind to that particular value, in our case to the first elements price field. Any changes made to the input will reflect back to the {{ product.productListing[0].price }} value. Here's a quick snapshot of the whole thing in action:
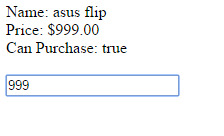
Very quick example, but it gets the job done. A few things to notice are the dollar symbol in the price field, which was made possible by having the currency flag set in our expression above, and that the CanPurchase value does translate over as a boolean expression. Most important thing to notice though is that the input fields value stays in sync with the price field. And it's this binding feature that makes Angular such a powerful tool. It reduced the amount of tedious work that you would have to do if you were keeping values in sync manually.
There's tons and tons more that you can do with Angular. I just wanted to show a super quick setup and run process that anyone can get running in 5 minutes or less. This is how I learned it and I hope it helps someone else learn it as well. Happy coding!
Walt is a software engineer, startup founder and previous mentor for a coding bootcamp. He has been creating software for the past 20+ years.