It's time to take what I've learned about Crafty.js in the past couple of weeks and to put it to use and build a side scroller game. Also, after Googling for Crafty.js side scroller tutorials, I can't seem to find many results, so hopefully this helps out anyone else that has been doing the same. If you haven't read my part 1, part 2, or part 3, I'd recommend you do that first, as it covers the basics of Crafty.js which I will glance over in this side scroller write up. Crafty.js is a pretty flexible game engine built entirely in JavaScript which means it can run on practically any browser. And more importantly, if you already know JavaScript, then you are 3/4's of the way from learning Crafty.js. Let's take a look at a quick view of what makes up a Crafty.js game.

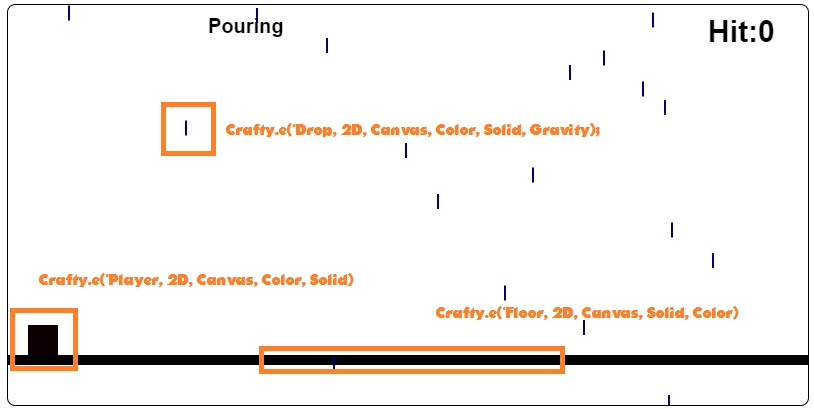
Crafty.js games are made up of Entities and get their functionality from built in and user defined Components. Crafty.js can wrap entities into Scenes, which you can load at any point in the life cycle. Elements such as gravity and collision detection are wrapped into Components, which makes working with them super easy and effective. If you want an entity to "fall", you simply apply to it the "Gravity" component and set a few properties. For example, in the above screenshot, the rain dropplets have the Gravity component specified, which automatically makes them fall to the bottom of the screen. Once at the bottom, I destroy the entities to avoid memory issues.
Features to Build
There are a few things that I want this game to include, mainly the standard things that most games nowadays have. I want to have a splash screen, a title screen, and of course my level. I want the game to have an objective, such as reach this area by this time, or reach this area without "x event happening". And when I do reach the end, I want the scene to end and to bring up another scene. I won't into making the second scene, because it will pretty much be the same process as making the first, but it'll be a good starting point for an actual game.
As far as visuals go, I want to have a scrolling background image, and an actual eight bit character image and not just a block like I have in my other posts. In order to make the 8 bit image, I will be using an online pixel building editor. Both the background and the character that I built were made using it.
Let's Get Started
The first thing I want to get off the old list is the splash screen with my websites logo. After 3 or so seconds I want it to vanish, and to load my title screen. And thanks to the Crafty.js component system, you can easily add the 'Tween' component, which allows us to play around with animations and alpha channel manipulations. And to give credit where credit is due, check out the following implementation of a transitioning scene loader which does the job beautifully.
Very awesome job there. Now whenever I want to load a scene with a transition period, I simply call that function instead of the default Crafty.enterScene one.
Splash Screen
Normally, you're splash screen will feature information about production companies and design studios, and whoever else helped with the project. In my case, I'm just going to be loading an image with my websites logo. And for that, I can either load an image entity, or set the background property in the main Crafty object. I've chosen to simply just set the background of the current scene to my logo image, with a white background. After a 3 second transition period, the "HomeScreen" scene will load.
Title Screen
Loading the title screen is the same as loading the splash screen. I define a new Scene and I can pretty much add anything that I want onto it. In my case, I added a new entity with a Text component, which I then styled somewhat and turned it into the title of the game, and then another Text entity with a click event bound to it. And upon click, I simply load the level scene. This particular scene gets called at the end of the splash screen loading event.
Scrolling Background
So far so good. We have a splash screen, a title screen, and they have a transition set when jumping between them. Up next I'm going to be loading the same game that I created in my part 3, however with a few slight modifications. First up, I'm going to be a using a background image in this stage that will need to move with the viewport to give the effect of moving forward. Personally, I couldn't find a direct way to do this with Crafty.js, but the awesome thing is that Crafty.js is pure JavaScript, which means I can use JavaScript anywhere to get anything done.
The first thing I'm going to do is to define a new scene for the first level in the game. And I'm going to set a background image that will take up the entire contents of the viewport.
This will load the background image, but it won't do much else. Currently the code is set up to have the viewport update as the character walks forward. However, our background will remain stationary. But we can fix that. Let's take a look at the full definition for the level scene right below, with the important parts highlighted.
Because we can still use pure JavaScript in our code, I can still manipulate the game canvas background image anyway that I want. I couldn't find the equivalent using the framework, but then shortly realized that what I wanted wasn't very complex. I want to update the x position of the background image, and because it is set to repeat horizontally, we'll get that moving forward effect.
Loading The Character Sprite
Previously I was using a white box as my character, because it's easy to work with. This time around though, I'm going to add a sprite character in place of that. And with Crafty, that's surprisingly easy and will require very little code change. If you look at the code snippet above, I added another Component to my player entity called dude. This dude, is our sprite character, which I can define with the following, either somewhere outside my scene definition, or in the scene definition itself:
Crafty.sprite("dude2.png", {dude:[0,0,50,100]});
After this, I can begin to use the sprite character wherever I please. Just for this example, the image sprite just has one character. In a more worked out game, he would have all of his many phases and depending on the characters current state, I would render a different frame. I didn't make that many changes to my previous game demo, but you can see that with a little bit of work, you can start to make something that's a bit more complex. Here's a working example of the entire thing, plus the full source at the bottom.
View Full Source
<html>
<head>
</head>
<body>
<div id="game" style="margin:0 auto;"></div>
<script type="text/javascript" src="https://rawgithub.com/craftyjs/Crafty/release/dist/crafty-min.js"></script>
<script>
var screenWidth = 800;
var screenHeight = 400;
var hitCounter = 0;
var player1;
var levelWidth = 1600;
var bg;
Crafty.init(screenWidth,screenHeight, document.getElementById('game'));
//Crafty.sprite("dude2.png", {dude:[0,0,50,90]});
Crafty.defineScene("HomeScreen", function() {
Crafty.background("#000");
Crafty.e("2D, DOM, Text, Mouse")
.attr({ w: 300, h: 20, x: 100, y: 200 })
.text("Click to start")
.css({ "text-align": "center"})
.textFont({size: '20px', weight: 'bold'})
.textColor("#FFFFFF")
.bind('Click', function(MouseEvent){
load_scene("Level1", 1000);
});
Crafty.e("2D, DOM, Text")
.attr({ w:400, h:40, x: 50, y: 50})
.text("Rein")
.textFont({size:'130px', weight:'bold'})
.css({"text-align": "center"})
.textColor("#FFFFFF");
});
Crafty.defineScene("Splash1", function(){
Crafty.background('#FFFFFF url(thatsoftwaredude.png) no-repeat center center');
load_scene("HomeScreen", 3000);
});
Crafty.defineScene("Level1", function(){
bg = Crafty.background('#FFFFFF url(bg2.png) repeat-x center center');
Crafty.e('Floor, 2D, Canvas, Solid, Color, Collision')
.attr({x: 0, y: 380, w: levelWidth, h: 10})
.color('white');
Crafty.e('Floor, 2D, Canvas, Solid, Color, Collision')
.attr({x:levelWidth + 100, y:350, w:300, h:10})
.color('white');
Crafty.e('Floor, 2D, Canvas, Solid, Color, Collision')
.attr({x:levelWidth + 500, y:350, w:300, h:10})
.color('white');
Crafty.sprite("dude2.png", {dude:[0,0,50,90]});
player1 = Crafty.e('Player, 2D, Canvas, Color, Solid, Fourway, Gravity, Collision, dude')
.attr({x: 20, y: 0, w: 30, h: 30})
.fourway(6)
.gravity('Floor')
.gravityConst(.2)
.checkHits('Floor')
.bind("KeyUp", function(e){
e.preventDefault();
})
.bind("Moved", function(){
if (this.x >= (screenWidth / 2))
{
Crafty.viewport.x = (this.x - (screenWidth / 2)) * -1;
document.getElementById("game").style.backgroundPosition = Crafty.viewport.x + "px";
}
if (this.y >= (screenHeight))
{
Crafty.viewport.x = 0;
Crafty.enterScene("Level1");
}
});
});
load_scene("Splash1", 3000);
function drop()
{
var randomx = Math.floor((Math.random() * levelWidth) + 50);
Crafty.e('Drop, 2D, Canvas, Color, Solid, Gravity, Collision')
.attr({x: randomx, y: 0, w: 2, h: 15})
.color('#FFFFFF')
.gravity()
.gravityConst(.5)
.checkHits('Player')
.bind("HitOn", function(){
this.destroy();
})
.bind("EnterFrame", function() {
if (this.y > screenHeight)
this.destroy();
});
}
function load_scene(scene, duration) {
    Crafty.e("2D, Canvas, Tween, Color")
        .attr({alpha:0.0, x:0, y:0, w:800, h:600})
        .color("#000000")
        .tween({alpha: 1.0}, duration)
        .bind("TweenEnd", function() {
            Crafty.scene(scene);
            Crafty.e("2D, Canvas, Tween, Color")
                .attr({alpha:1.0, x:0, y:0, w:800, h:600})
                .color("#000000")
                .tween({alpha: 0.0}, duration);
        });
}
Crafty.bind("EnterFrame", function(){
if (Crafty.frame() % 2 == 0)
drop();
});
</script>
<input type="button" value="pause" onclick="pause()" />
<input type="button" value="reset viewport" onclick="reset()" />
<div id="message" class="message"></div>
</body>
</html>