- Web Pages and WebMatrix
- Razor View Engine
- Database Operations
- @Helper and @Functions
- AJAX
- Login and Authentication
- Anything I Left Out
I've started using ASP.NET Web Pages recently for an old website redesign that I am doing this year and after some Googling and blog reading and book skimming, I've got a pretty good idea of the overall structure. As with any new technology (new to anyone), there's a learning curve. Lucky for me it's pretty small in this particular case. If you're new to .NET it should be pretty easy to pick up and if you're a veteran, it should make it that much easier to get your work out to the world.
Visual Studio 2013 allows for any type of ASP.NET web technology interlaced within the same project. I could continue to use Web Forms plus add any MVC3 and ASP.NET Web Pages that make sense to the project. For this current redesign, many of the old web form pages that didn't receive much traffic but that I need for SEO purposes I will copy over directly as web forms. While the new redesigned pages will use ASP.NET Web Pages using the Razor 3 view engine. For times sake and to reduce a level of complexity I won't be touching MVC 3 this time around but perhaps soon on another blog post.
Database operations, file manipulation, site/layout features, and also the use of the many tools that come built in to Web Pages and WebMatrix create a slight learning curve. But it's only just slight. Here are the basics on Web Pages so that you can quickly start building your own sites.
1. ASP.NET Web Pages and WebMatrix
Web Pages are a lightweight alternative to traditional .NET Web Forms and ASP.NET MVC that relies on the Razor View Engine and can be developed using Microsoft WebMatrix. WebMatrix is a new lightweight IDE with full intellisense, database utilities and built in server and best of all it's totally FREE. Web Pages can also be built in Visual Studio 2013 of course, which is where I will be doing all of my development. But if you want to install and test out WebMatrix3, feel free to check out the download page here.
There are a number of differences between Web Forms and Web Pages. The biggest one being that the code-behind pages are now gone along with the .aspx extension. Web Pages are .cshtml pages and all server code is done inline or using helper functions. Razor code is typed directly on the page wherever you may need it, and the pages come automatically off the bat with URL routing enabled.
/website/about.cshtml => /website/about/
both render the same webpage. Much more convenient then fiddling with the URL Rewriter in IIS.
2. Razor View Engine
The Razor view engine is intended to simplify many of the more tedious and complex functions that were common place in .aspx pages. The new .cshtml pages gets rid of the code-behind pages that we all so loved in the previous versions and makes use of a cleaner and less cumbersome inline syntax which aims to reduce complexity for both new and old devs. No more opening/closing inline tags littering the awesome html you worked so hard to come up with. But, you also learn certain important things, such as the page life cycle, which is useful for complex applications.
Razor itself is pretty straight forward. The best way to approach it is, if you need code somewhere just add an '@' character and write it. The view engines parser is good at figuring out what's code and what's not and as such you don't have to worry much about tedious closing tags and remembering when to switch from " to ' and back again in order to get a dynamic string to render correctly. There are a few edge cases, as with anything, with Razors parser, but when in doubt just wrap your Razor code with () and you are good to go. This is what makes Razor pop. Your code just looks that much cleaner and it's easier to work with.
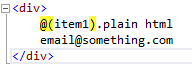
The @(identifier) syntax will take care of any
Razor edge-case parsing issues. Razor is also
smart enough to recognize emails so that you don't
to escape the @ character.
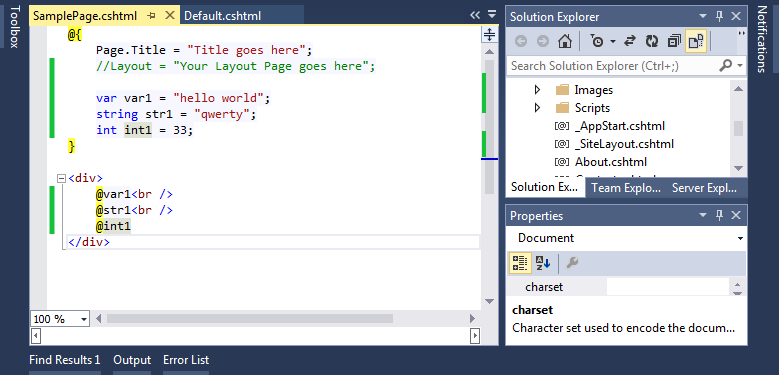
Here's a quick example of Razor in action.
Variables are declared in the top code block
and then they can be used anywhere in the page after.
3. Database Operations
WebMatrix has simplified database operations to the point that I probably no longer need my own custom data access layer that I worked so painstakingly to make. But that's not a bad thing. In the end, the website will look and feel the same regardless of the path to get there. And if I really wanted to, I could continue to use my own libraries and dll's in the same way as before. Examples speak 1000 words.
The Database class comes from the WebMatrix namespace (WebMatrix.Data) and the Open method will first look for any local databases in the App_Data folder whose name matches the passed in parameter. If it can't find one, it will next try to connect to the ConnectionString in the web.config with the appropriate name. There are several different methods in the Database class that return various types of records depending on your needs:
var db = Database.Open("databasename")
string query = "select * from table1";
string query2 = "select firstname from user where id = 1";
string query3 = "select * from user";

var results = db.Query(query);  // returns a list of rows
var row = db.QuerySingle(query3); // returns a single row
var field = db.QueryValue(query2);  // returns single value
Parameterized Queries
Lucky for us, the WebMatrix classes make parameterized queries a snap. No more creating a list of SqlParameter objects for every single query and making sure the order and column types were set accurately.
var id = 9;
var db = Database.Open("dbname");
var query = "select * from user where id = @0";
// pass in the parameter list after the query
var result = db.Query(query, id);
If we have more parameters we simply continue the chain in the query: @0, @1, @2, etc.
4. Helpers and Functions
@helper
Helpers in Web Pages are the equivalent of User Controls in web forms. They are pre-defined snippets of HTML and server side code that you can call anywhere in your project. The cool part is that they support the full Razor syntax so you can include anything you normally could in your normal pages. Here's the same example from above.
The example above covers a few things. First off you declare a helper using the @helper keyword. Secondly, helpers can accept parameters. Aside from that, it works just like any other cshtml page. You can mix in Razor, html and call other helpers if the need arise. If you need to declare a namespace to use certain classes, you can declare them at the top of the page as follows.
@functions
Razor Web Pages also support functions, either declaring them on the same page, or externalizing them to a central location in the App_Code folder.
In the example above you can see that you define a block of functions first by using the @functions keyword, and then you can declare your static functions inside of that block.
Calling helpers and functions is just as simple.
5. Login and Security
Most developers who create their own websites will probably have their own login systems enabled on their sites. I've personally have never used the .NET Membership and Role classes and have not worked on a website professionally yet that does. Not to say that it is a bad system, but usually demands on the business part make such implementations more of a hassle than anything else. Without such business demands, then feel free to not rebuild the wheel and make use of all the built in features that Web Pages Membership offers.
ASP.NET Web Pages brings with it the WebSecurity class to aid us in our user creation, editing, and authorizing tasks. Before you can start working with the WebSecurity class however, you must have the WebSecurity database created. If you select one of the standard website templates when creating your project the database should be created automatically.
The code above should be located in the _AppStart.cshtml will run each time the web site (application) starts. It initializes the WebSecurity database, however remember that the database must exist beforehand. There's a slew of built in functions that aid in account creation and validation, and it would take a whole other blog post to go through them all (stay tuned!). For now, here's a quick list of the most important ones.
ChangePassword() Changes the password for a user
ConfirmAccount() Confirms an account using a confirmation token
CreateAccount() Creates a new user account
CreateUserAndAccount() Creates a new user account
GeneratePasswordResetToken() Generates a token that can be sent to as user by email
GetCreateDate() Gets the time the specified membership was created
GetPasswordChangeDate() Gets the date and time when password was changed
GetUserId() Gets a user ID from a user name
InitializeDatabaseConnection() Initializes the WebSecurity system (database)
IsConfirmed() Checks if a user is confirmed
6. AJAX
With traditional Web Forms I would normally make my AJAX requests by registering a Web Service with the ScriptManager and making requests directly to the service. There's always the tried and true way of doing it directly with Javascript or jQuery as well. I'm not exactly sad that I'm saying goodbye to the ScriptManager. It was a good tool, but the overhead on it always made me cringe a bit. Back to more traditional methods. With VS 2013 projects coming in out of the gate with full jQuery intellisense it isn't a hassle to switch some code over to make it work with jQuery Ajax. Here's a quick example.
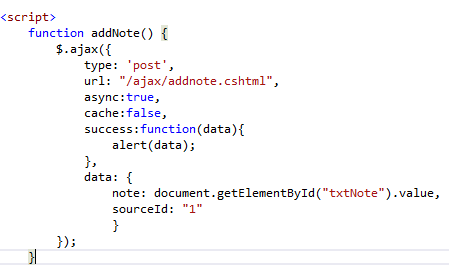
Here's the jQuery request to addnote.cshtml
which will add a "Note" to the database
based on the source ID.
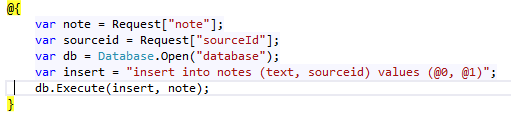
notes.cshtml
The script being requested grabs all posted data
using the
Request object and does a
quick parameterized insert, which I covered above.
7. Anything Else I Left Out
Within a Razor code block comments are written in the traditional notation that's common to almost any programming language.
Outside of a Razor code block, comments are either html comments or:
Grabbing Different Parts Of The URL
Very simple with the provided HTML helpers.
Ex: www.thatsoftwaredude.com/content/1/name-of-post
In that particular case if I needed the ID of the content to say grab it from the database, I can grab it using @UrlData[0]. @UrlData[1] would of course return what follows which is the title of the post.
Escaping the @ Symbol
The @ character is escaped with @.
Ex: var username = "@@username";
Ex: var email = "
[email protected]";
Notice that in the case of emails, Razor is smart enough to determine that the @ symbol in an email isn't intended for inline code.
This was intended to be a very quick rundown of the basics needed to get a site up and running using Web Pages. As with any other technology there's tons more stuff to dive into and learn, tons more built-in helper functions to help facilitate development and alot more scenarios that will leave you Googling for hours. I hope it helps anyone just starting out with ASP.NET Web Pages and in future posts I'll be diving into some of these topics a bit further. For any questions on anything, feel free to send me a message at any time.