An AI model can know a lot about the world, but it doesn't automatically know anything about your world.
You can typically get around that by giving it a massive system prompt. You can keep appending previous messages to the conversation. You can even stuff entire documents into the context window.
Eventually, though, that gets expensive, slow, and difficult to manage.
A better approach is to give the application a place to store that knowledge and retrieve only the pieces that matter for the current request. A memory, if you will.
And that's essentially the role that GoodMem plays.
GoodMem is a memory layer between agents and their data. Documents and other content are stored as persistent, searchable memory, and an application can retrieve relevant pieces whenever the model needs them.
And as someone who's daily developer workflow heavily involves AI agents, this is right up my alley.
For this article, I decided to give an agent access to something I already had plenty of:
my own blog posts.
I exported a few blog posts from ThatSoftwareDude and loaded them into GoodMem, and built a small TypeScript application that could ask questions across my personal content.
The finished flow looks roughly like this:
blog posts
      ↓
GoodMem
      ↓
chunking
      ↓
OpenAI embeddings
      ↓
semantic retrieval
      ↓
Voyage reranking
      ↓
best matching chunks
      ↓
Claude
      ↓
final answer
My Setup
My current development work goes down on my Windows machine and for most new projects nowadays, I typically favor Node applications.
Lucky for me, GoodMem offers their SDK in Typescript, as well Python, Java, .NET and Go.
You're also going to need to have Docker installed on your machine and be running WSL.
Windows Subsystem for Linux (WSL) is a feature of Windows that allows you to run a Linux environment on your Windows machine, without the need for a separate virtual machine or dual booting.
You can test if you have it installed by running the following command:
wsl --version
Install Locally
To start off, head over to the docs page and get acquainted with how GoodMem works.
Once you're ready, click on the download page and look for the "Install Locally" section.
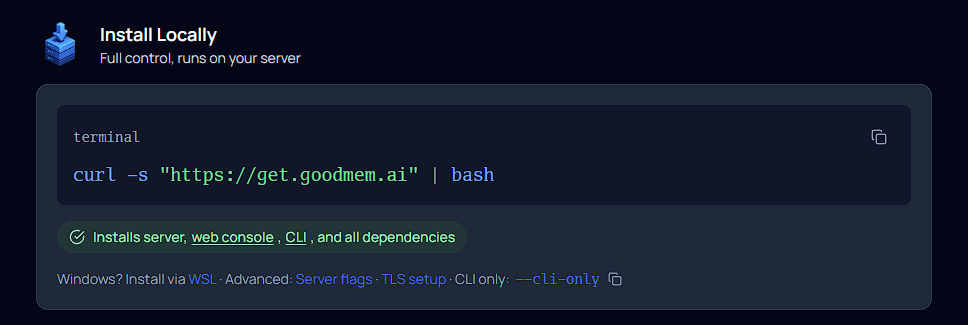
For those on Windows, you can run the following command to install GoodMem locally:
wsl bash -lc 'curl -fsSL "https://get.goodmem.ai" | bash'
You'll be asked for your Linux password before anything else.
** Note **
Before you start the installation, you'll need to ensure that your Docker configuration is set to enable integration with WSL.
Otherwise, you'll get the following error:

Open up your Docker Desktop:
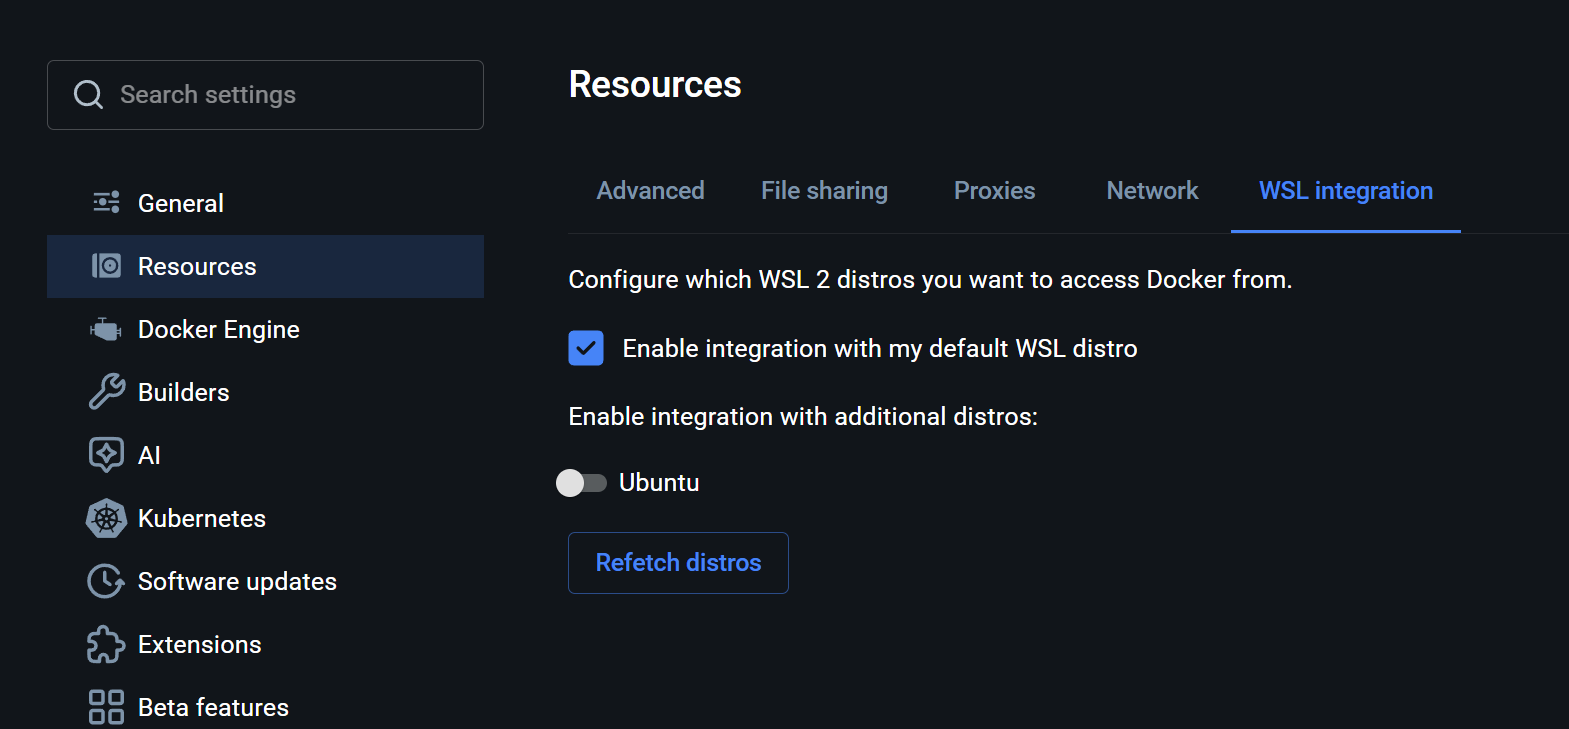
And ensure that the 'Enable integration with my default WSL distro' is selected.
Once that's configured, you can run the installation, and if all goes well, you'll be asked which database mode to use.
Choose the 'Local PostgreSQL' option and click enter:
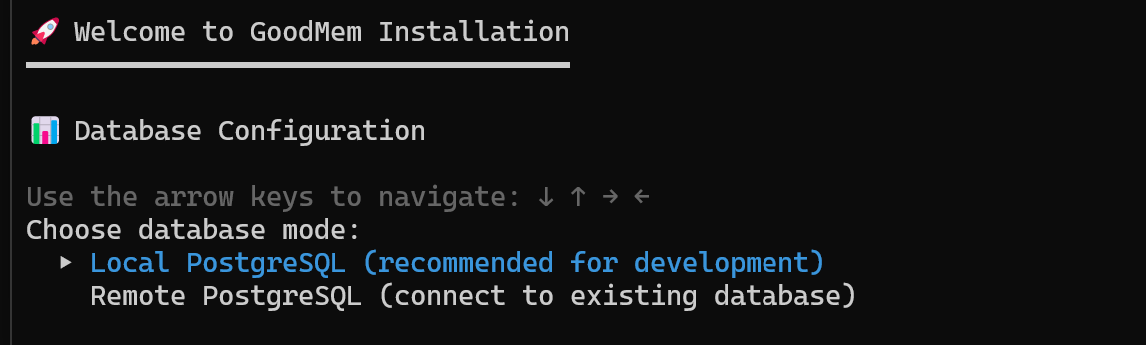
You'll then have to set a password for your new database and when asked if you want to provide a custom TLS certificate, type 'n' and hit enter.
Once your installation is done, you'll see a confirmation message resembling the following:
✓ Installation completed successfully!

ℹ GoodMem is ready to use.
ℹ Web console: https://localhost:8080/console

ℹ Active profile: default
ℹ   Server URL:   https://localhost:9090
ℹ   API Key:      gm_xxxxxxxxxxxxxxxxxxxxxxxx
ℹ   Install type: local-docker
Even though we're going to be doing most of our work in the CLI, it's definitely worth paying a visit to the web console.
Most of what we're about to do through the CLI can also be done visually there as well.
What does "long-term memory" mean here?
It's worth clarifying this before going any further.
We're not building an agent that autonomously remembers that you like dark mode because you mentioned it three weeks ago.
That is one form of agent memory.
Here we're talking about persistent external knowledge.
Instead of requiring the model to already know something or sending the same giant document with every prompt, the information lives outside the model.
When a user asks a question, the application retrieves relevant information and adds it to the model's context.
That pattern is generally known as Retrieval-Augmented Generation, or RAG.
The useful distinction is:
The model's context window = what the model currently sees

GoodMem = what the application can remember and retrieve later
That's the sense in which we're giving the agent long-term memory.
Creating an embedder
Before GoodMem can perform semantic search, it needs a way to turn text into embeddings.
An embedding is a list of numbers produced by running text through a model. Send it a string, get back a vector:
"Create React App migration"

→ [-0.0142, 0.0318, -0.0091, 0.0455, ..., 0.0227]
     1536 numbers, truncated here
No individual number means anything. What matters is where the vector sits relative to other vectors: similar meaning, similar direction.
query: "Create React App migration"

"moving off CRA to Vite"            0.71
"upgrading our build tooling"       0.54
"React hooks best practices"        0.38
"how to bake sourdough"             0.04
The top match shares no words with the query. That's the whole point, keyword search misses it, embeddings don't.
Two practical consequences. Distances only mean anything between vectors from the same model, so swapping embedders later means re-embedding everything you've stored.
And vectors are fixed-length regardless of input size, which is why a stored chunk and a one-line query are directly comparable.
For this example I'm using OpenAI's text-embedding-3-small (1536 dimensions), mainly because I have spare OpenAI tokens.
Register the embedder with GoodMem
In your WSL console, run the following command, ensuring you add your own OpenAI API key:
goodmem embedder create \
  --display-name "OpenAI Embedder" \
  --provider-type OPENAI \
  --endpoint-url "https://api.openai.com/v1" \
  --model-identifier "text-embedding-3-small" \
  --dimensionality 1536 \
  --distribution-type DENSE \
  --cred-api-key YOUR_OPENAI_API_KEY
GoodMem will return an ID for this specific embedder, which we'll need to use next when creating a new space on GoodMem.
You don't need to keep track of the ID, as the web console gives us a page to manage our embedders.

Nothing has been embedded just yet.
At this stage we've only told GoodMem:
When I need an embedding, use this OpenAI model.
Creating a Space
Next we need somewhere to put our memories.
GoodMem calls this a Space.
A Space is a container for related memories, and every Space needs at least one embedder associated with it.
Create one:
goodmem space create \
  --name "ThatSoftwareDude Articles" \
  --embedder-id YOUR_EMBEDDER_ID
GoodMem will return a Space ID once that's completed. And once again, you don't need to jot it down, as it is readily available in the web view.
 There's another important thing happening here that isn't immediately obvious:
the Space also controls how documents are chunked.
What is chunking?
Sending an entire 4,000-word article through retrieval as one giant block usually isn't very useful.
An article might discuss ten different concepts.
Instead, RAG systems normally break documents into smaller pieces:
Article 1
  ↓
Chunk 1
Chunk 2
Chunk 3
Chunk 4
...
Each chunk gets its own embedding.
Then when someone asks:
How should environment variables work in Vite?
the system can retrieve the paragraph or section discussing environment variables instead of returning an entire article about Vite.
GoodMem's default recursive chunking configuration uses a chunk size of 512 and an overlap of 64, measured in characters unless configured otherwise. Both the Space defaults and individual memories can be customized.
You could explicitly create a Space with different values:
goodmem space create \
  --name "ThatSoftwareDude Articles" \
  --embedder-id YOUR_EMBEDDER_ID \
  --chunking recursive \
  --chunk-size 1024 \
  --chunk-overlap 128
For this first experiment, however, I wanted to see what the defaults would do.
Loading the documents
My source material originally came from JSON, but JSON isn't necessarily what I want to embed.
A CMS export might look something like:
{
  "id": 12345,
  "slug": "migrating-cra-to-vite",
  "published": "2026-03-10",
  "body": "<p>...</p>"
}
The IDs, serialized structure, escaped HTML and other metadata don't necessarily help semantic retrieval.
For article content, Markdown gives us a much cleaner representation:
# Migrating from Create React App to Vite

Published: 2026-03-10
URL: https://www.thatsoftwaredude.com/...

## Why migrate?

...

## Environment variables
...
For my first test I exported a couple of my blog posts on Vite and saved them as markdown files:
goodmem memory create \
  --space-id YOUR_SPACE_ID \
  --file ./thatsoftwaredude-articles.md
GoodMem can infer content type from the file extension, and its memory command also supports metadata and custom per-document chunking.
Once uploaded, GoodMem processes the document, chunks it, calls the embedder and stores the resulting representations.
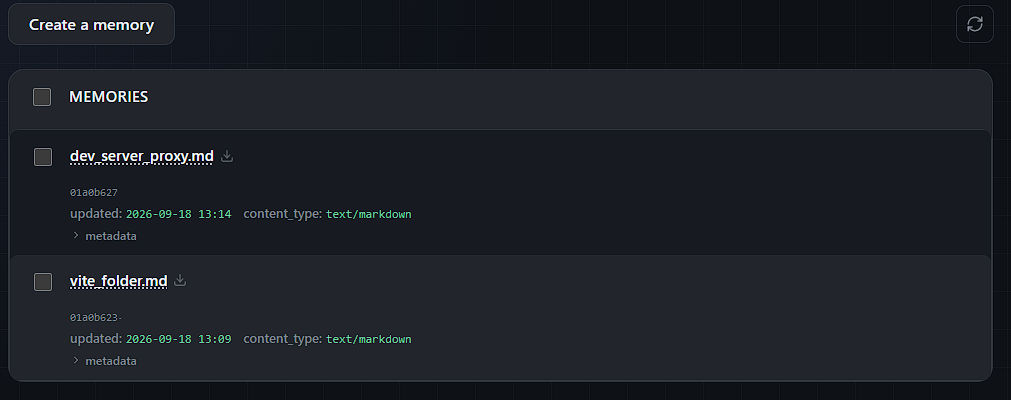
Now we finally have something searchable.
Testing retrieval before adding an LLM
One thing I strongly recommend is testing retrieval before involving Claude, Gemini, GPT or another LLM.
Otherwise, it's easy to blame the wrong part of the system when the answer isn't good.
I started with:
goodmem memory retrieve \
  "how to convert from cra to vite" \
  --space-id YOUR_SPACE_ID
And GoodMem returned ten chunks.
Success.
The top results looked like this:
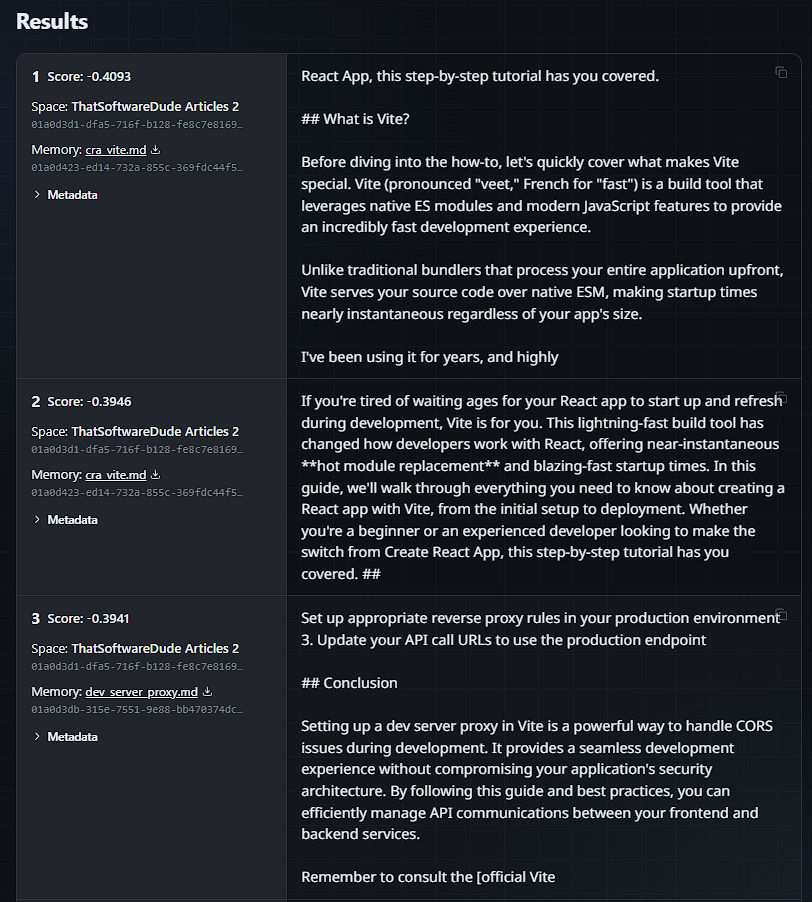
It was definitely related to Vite.
But it wasn't particularly related to migrating from Create React App to Vite.
I tried making the question more explicit:
What changes are needed when replacing Create React App with Vite?
The results improved, but I was still getting chunks about environment variables, folder structures and general Vite configuration.
This is an important distinction.
The retrieval wasn't broken.
It had successfully identified:
Vite question
→ Vite content
It just hadn't necessarily found the best CRA to Vite content.
And that's where reranking comes in.
Adding a reranker
Vector similarity search is fast, but the closest vectors are not always the passages that best answer the user's actual question.
A reranker gives those candidate results a second look.
Think of the process as:
Question
   ↓
Vector search
   ↓
20 plausible chunks
   ↓
Reranker
   ↓
5 strongest chunks
GoodMem's own RAG tutorial describes its initial retrieval as a fast dot-product search and recommends a reranker when greater accuracy is needed.
OpenAI doesn't currently offer a reranking model, so I followed GoodMem's example and used Voyage AI's rerank-2.5 model.
Create a Voyage API key and register the reranker:
goodmem reranker create \
  --display-name "Voyage rerank-2.5" \
  --provider-type VOYAGE \
  --endpoint-url "https://api.voyageai.com/v1" \
  --model-identifier "rerank-2.5" \
  --cred-api-key "YOUR_VOYAGE_API_KEY"
GoodMem supports Voyage as a reranker provider directly, so the Voyage credentials stay registered with GoodMem rather than requiring our application to manually call Voyage every time.
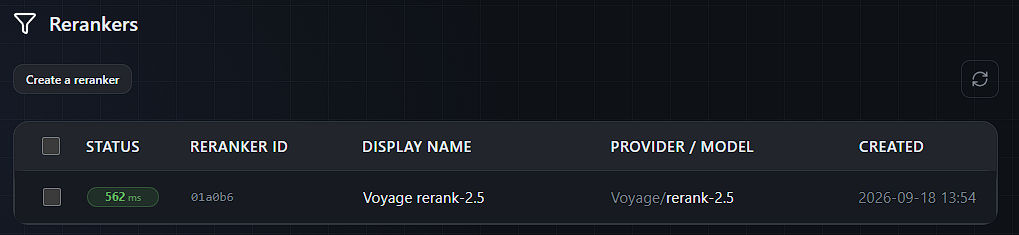
You should also see the rerankers listed in your web console:
And now running a search with the same query as above using the reranker yields the following:
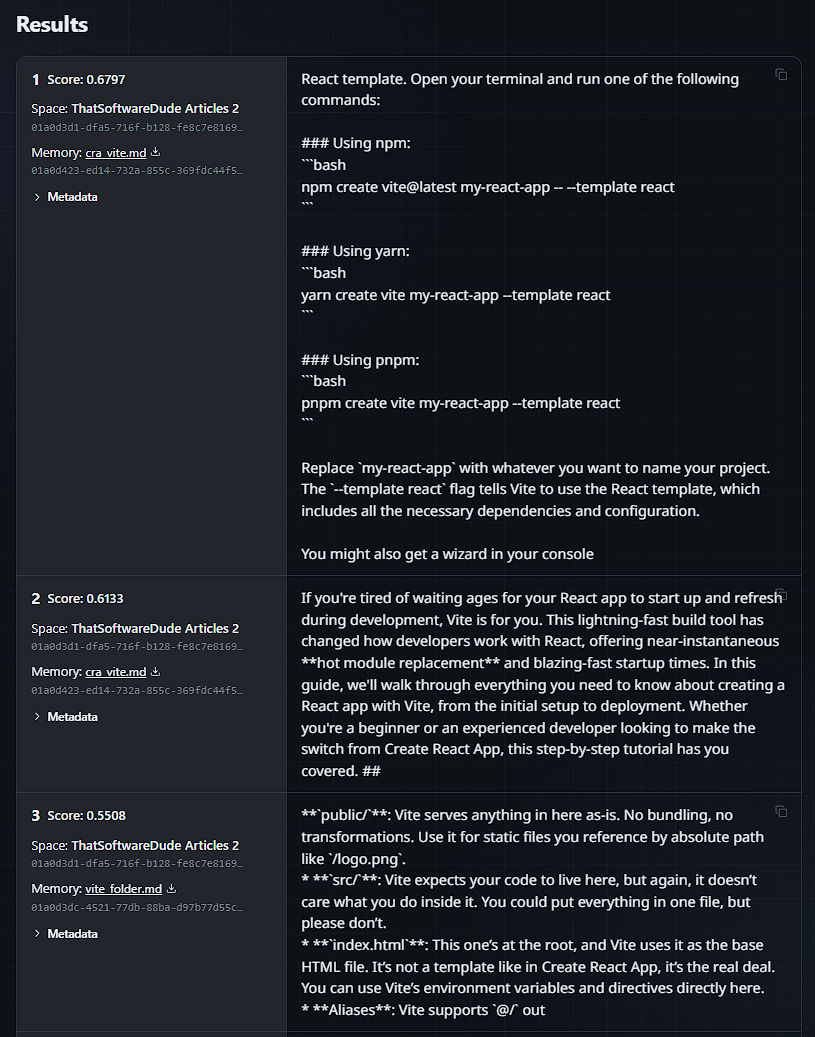
And you can see that the overall Scores are higher and the results are more aligned with our initial query.
Creating an LLM
At this point we have:
✅ Embedder
✅ Space
✅ Memories
✅ Reranker
The last piece is the LLM GoodMem will use to generate the final answer.
GoodMem treats the LLM as another registered resource, just like the embedder and reranker.
For this example I'm using OpenAI:
goodmem llm create \
  --display-name "My GPT-5.1" \
  --provider-type OPENAI \
  --endpoint-url "https://api.openai.com/v1" \
  --model-identifier "gpt-5.1" \
  --cred-api-key YOUR_OPENAI_API_KEY \
  --supports-chat
GoodMem will return an ID for the new LLM.
Save that:
LLM_ID=...
Or don't, as (you guessed it), you can manage it from the web console.
That ID is what ties the final generation step into the rest of the RAG pipeline.
We now have all of the pieces:
Embedder
   ↓
Space + Memories
   ↓
Reranker
   ↓
LLM
When we run retrieval, we can pass both the reranker ID and LLM ID to GoodMem.
That lets GoodMem handle the entire sequence:
user question
    ↓
semantic retrieval
    ↓
candidate chunks
    ↓
Voyage reranking
    ↓
best context
    ↓
LLM
    ↓
final answer
For example:
goodmem memory retrieve \
  --space-id YOUR_SPACE_ID \
  --post-processor-args '{
    "llm_id": "YOUR_LLM_ID",
    "reranker_id": "YOUR_RERANKER_ID"
  }' \
  "how to convert from cra to vite"
And the final response looks something like the following:
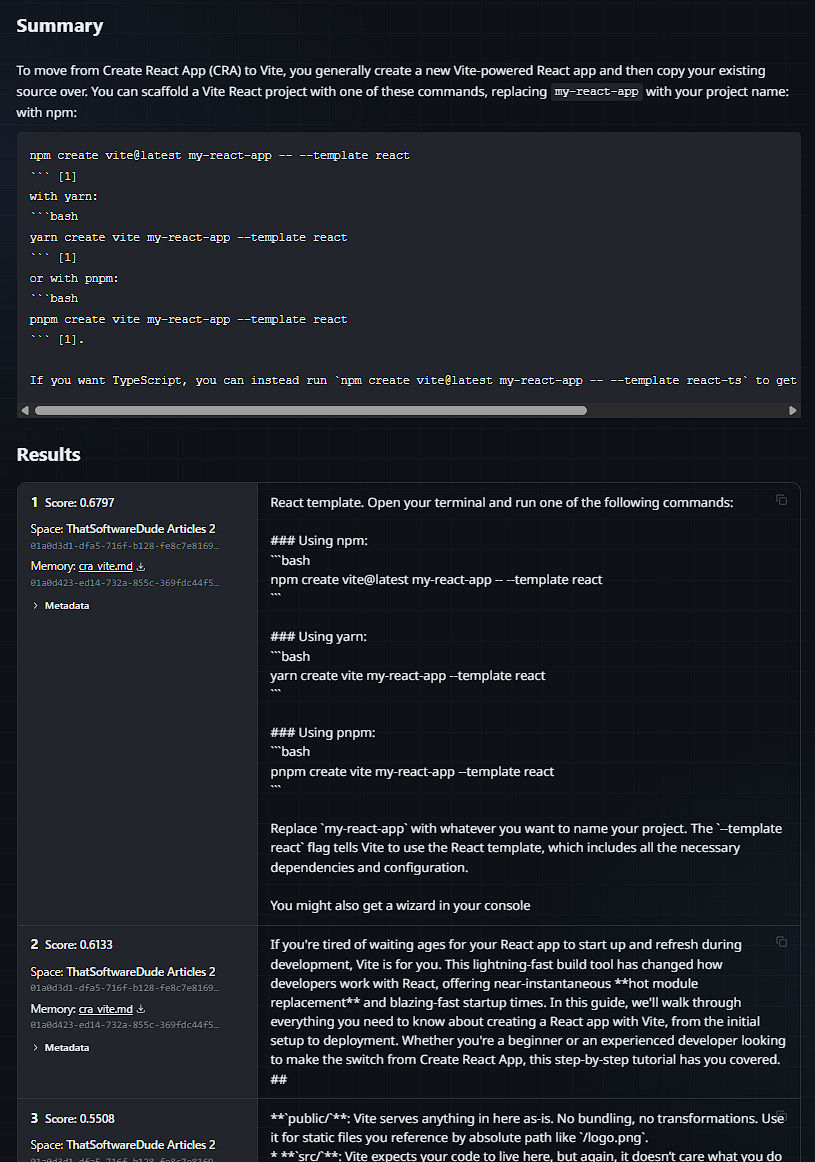
The result set looks the same as the previous one with just the reranker, but now we have a full summary of the results which more strongly aligns with our initial query.
Building a TypeScript agent
With all of the GoodMem resources registered, we can finally build the small TypeScript application that ties everything together.
Start by creating a new project folder:
mkdir goodmem-agent
cd goodmem-agent
Initialize Node:
npm init -y
Then install the dependencies:
npm install @pairsystems/goodmem dotenv
npm install -D typescript tsx @types/node
Create a TypeScript config:
npx tsc --init
And create the two files we'll need:
touch .env index.ts
At this point the project should look roughly like:
goodmem-agent/
├── .env
├── index.ts
├── package.json
└── tsconfig.json
The GoodMem SDK uses ES modules, so add the following property to package.json:
{
  "type": "module"
}
You don't need to replace the entire file. Just make sure "type": "module" exists alongside the other properties generated by npm init.
For example:
{
  "name": "goodmem-agent",
  "version": "1.0.0",
  "type": "module"
}
I also simplified my tsconfig.json to:
{
  "compilerOptions": {
    "target": "ES2022",
    "module": "NodeNext",
    "moduleResolution": "NodeNext",
    "strict": true,
    "skipLibCheck": true
  }
}
Now add the GoodMem configuration we've collected throughout the tutorial to .env:
GOODMEM_BASE_URL=https://localhost:8080
GOODMEM_API_KEY=YOUR_GOODMEM_API_KEY

GOODMEM_SPACE_ID=YOUR_SPACE_ID
GOODMEM_LLM_ID=YOUR_LLM_ID
GOODMEM_RERANKER_ID=YOUR_RERANKER_ID
With all of that configuration living inside GoodMem, the actual application code can stay surprisingly small.
Add the following to index.ts:
import "dotenv/config";
import { Goodmem } from "@pairsystems/goodmem";

const client = new Goodmem({
  baseUrl: process.env.GOODMEM_BASE_URL!,
  apiKey: process.env.GOODMEM_API_KEY!
});

const question =
  process.argv.slice(2).join(" ") ||
  "What changes are needed when replacing Create React App with Vite?";

for await (
  const event of client.memories.retrieve(question, {
    spaceIds: [process.env.GOODMEM_SPACE_ID!],
    llmId: process.env.GOODMEM_LLM_ID!,
    rerankerId: process.env.GOODMEM_RERANKER_ID!
  })
) {
  if (event.abstractReply?.text) {
    console.log(event.abstractReply.text);
  }
}
That's essentially the whole agent.
The important part is the retrieval configuration:
{
  spaceIds: [process.env.GOODMEM_SPACE_ID!],
  llmId: process.env.GOODMEM_LLM_ID!,
  rerankerId: process.env.GOODMEM_RERANKER_ID!
}
We're telling GoodMem which collection of memories to search, which reranker to use when sorting the results, and which LLM should generate the final response.
GoodMem handles the rest:
question
   ↓
search the Space
   ↓
retrieve candidate chunks
   ↓
rerank the chunks
   ↓
send the best context to the LLM
   ↓
generate an answer
The SDK streams several types of events during retrieval. For this small example, I only care about abstractReply, which contains the generated response.
Running the agent
Now we can pass a question directly from the command line:
npx tsx index.ts "What changes are needed when replacing Create React App with Vite?"
Or ask something else contained in the stored articles:
npx tsx index.ts "How should environment variables be handled in Vite?"
GoodMem will search the memories in our Space, rerank the relevant chunks, pass the resulting context to the registered LLM, and stream the generated answer back to our application.

On my Windows machine, the local GoodMem server was using HTTPS with a development certificate. That meant I needed to disable certificate verification while running this local demo from PowerShell:
$env:NODE_TLS_REJECT_UNAUTHORIZED="0"; npx tsx index.ts "How should environment variables be handled in Vite?"
That's strictly a local-development workaround. TLS verification shouldn't be disabled in production.
And that's it.
We now have a TypeScript application that can ask questions against a persistent collection of documents without manually handling embeddings, vector search, reranking, prompt construction, or context injection ourselves.
Final thoughts
The interesting part of this setup isn’t that an LLM can answer questions about a folder full of documents. That part is almost expected now.
What matters is that the knowledge lives outside the model.
GoodMem gives the application a persistent memory layer that can be updated, searched, reranked, and reused without retraining anything. The model only sees the handful of chunks that are relevant to the current question.
That separation makes the whole system much easier to reason about:
GoodMem = what the agent can remember

The LLM = what the agent can do with that memory
And after building this out, the biggest lesson for me was that RAG quality depends far more on retrieval than I expected.
Getting documents into a vector store is easy.
Getting the right document chunks back out is where chunking, document boundaries, metadata, embeddings, and reranking start to matter.
Once those pieces are working well, though, the actual TypeScript application becomes almost the easy part.
Which is probably exactly what you want from infrastructure like this.